注解
不是程序本身,可以对程序作出解释
可以被其他程序(比如:编译器等)读取,配合反射使用
内置注解
@Override : 定义在java.lang.Override中,此注释只适用于修辞方法, 表示一个方法声明打算重写超类中的另一个方法声明.
@Deprecated :定义在java.lang.Deprecated中,不推荐、废弃的方法,属性,类。
@SuppressWarnings : 定义在java.lang.SuppressWarnings中,用来抑制编译时的警告信息,需要添加参数才能使用,这些参数都是已经定义好了的,我们选择性的使用就好了.
1
2
3
4
5
6
7
8
9
public class Demo01 extends Object @SuppressWarnings("all") public static void test01 () int age; } public static void main (String[] args) } }
元注解 元注解的作用就是负责注解其他注解
@Target :用于描述注解的使用范围(即:被描述的注解可以用在什么地方)@Retention :表示需要在什么级别保存该注释信息,用于描述注解的生命周期。runtime是所有时候都有效
(SOURCE < CLASS < RUNTIME )
@Document:说明该注解将被包含在javadoc中@Inherited: 说明子类可以继承父类中的该注解
1
2
3
4
5
6
7
8
9
10
11
12
13
14
15
16
17
18
19
20
21
import java.lang.annotation.*;@MyAnnotation public class Demo02 void test () } } @Target(value = {ElementType.METHOD, ElementType.TYPE}) @Retention(value = RetentionPolicy.RUNTIME) @Documented @Inherited @interface MyAnnotation{ }
自定义注解
使用@interface 注解名 { 注解参数 }
注解参数的格式:参数类型+参数名();
1
2
3
4
5
6
7
8
9
10
11
12
13
14
15
16
17
18
19
20
21
22
23
24
25
26
27
28
import java.lang.annotation.*;public class Demo03 public static void main (String[] args) } @MyAnnotation2(name = "赵大宝",age = 12) public void test () @MyAnnotation3("baobao") public void test1 () } @Target({ElementType.METHOD,ElementType.TYPE}) @Retention(RetentionPolicy.RUNTIME) @interface MyAnnotation2{ String name () default "" ; int age () default 0 int id () default -1 String[] schools() default {"清华大学,辽宁大学" } } @Target({ElementType.TYPE,ElementType.METHOD}) @Retention(RetentionPolicy.RUNTIME) @interface MyAnnotation3{ String value () ; }
反射 加载完类之后,在堆内存的方法区中就产生了一个Class类型的对象 (一个类只有一个Class对象),这个对象就包含了完整的类的结构信息 。我们可以通过这个对象看到类的结构。这个对象就像一面镜子, 透过这个镜子看到类的结构,所以我们形象的称之为:反射
反射机制允许程序在执行期借助于Reflection API取得 任何类的内部信息 ,并直接操作 任意对象的内部属性及方法 。
获取类
知道类的路径名Class.forName()
知道类Class_name.class
知道类的实例对象Class_instance.getClass()
1
2
3
4
5
6
Class clz = Class.forName("java.lang.String" ); Class clz = String.class; String str = new String("Hello" ); Class clz = str.getClass();
创建类对象 使用newInstance()函数
通过Class对象创建类对象,只能使用默认无参构造方法
通过 Constructor 对象创建类对象可以选择特定构造方法
1
2
3
4
5
6
Class clz = Apple.class; Apple apple = (Apple)clz.newInstance(); Class clz = Apple.class; Constructor constructor = clz.getConstructor(String.class, int .class); Apple apple = (Apple)constructor.newInstance("红富士" , 15 );
获取类属性
getFields()获取非私有属性getDeclaredFields()获取所有属性,包括私有属性
1
2
3
4
Class clz = Apple.class; Field[] fields = clz.getFields(); Field[] fields = clz.getDeclaredFields();
获取类方法 1 2 3 4 5 6 7 8 9 10 11 12 13 14 private void welcome (String tips) System.out.println(tips); } Class clz = Apple.class; Apple apple = (Apple)constructor.newInstance("红富士" , 15 ); Method[] methods = clz.getMethods(); Method[] methods = clz.getDeclaredMethods(); Method method = clz.getMethod("welcome" ,String.class); method.setAccessible(true ); method.invoke(apple,args1);
性能 反射来执行方法比直接执行方法要慢很多,实在要用反射建议setAccessible(true)
1 2 3 4 5 6 7 8 9 10 11 12 13 14 15 16 17 18 19 20 21 22 23 24 25 26 27 28 29 30 31 32 33 34 35 36 37 38 39 40 41 42 43 44 45 package com.reflection;import java.lang.reflect.InvocationTargetException;import java.lang.reflect.Method;public class Demo09 public static void main (String[] args) throws NoSuchMethodException, IllegalAccessException, InvocationTargetException test1(); test2(); test3(); } public static void test1 () User user = new User(); long start = System.currentTimeMillis(); for (int i = 0 ; i < 1000000000 ; i++) { user.getName(); } long end = System.currentTimeMillis(); System.out.println(end-start+"ms" ); } public static void test2 () throws NoSuchMethodException, InvocationTargetException, IllegalAccessException User user = new User(); Class c1 = user.getClass(); Method getName = c1.getDeclaredMethod("getName" ,null ); long start = System.currentTimeMillis(); for (int i = 0 ; i < 1000000000 ; i++) { getName.invoke(user,null ); } long end = System.currentTimeMillis(); System.out.println(end-start+"ms" ); } public static void test3 () throws NoSuchMethodException, InvocationTargetException, IllegalAccessException User user = new User(); Class c1 = user.getClass(); Method getName = c1.getDeclaredMethod("getName" ,null ); getName.setAccessible(true ); long start = System.currentTimeMillis(); for (int i = 0 ; i < 1000000000 ; i++) { getName.invoke(user,null ); } long end = System.currentTimeMillis(); System.out.println(end-start+"ms" ); } }
反射获取注解 1 2 3 4 5 6 7 8 9 10 11 12 13 14 15 16 17 18 19 20 21 22 23 24 25 26 27 28 29 30 31 32 33 34 35 36 37 38 39 40 41 42 43 44 45 46 47 48 49 50 51 52 53 54 55 56 57 import java.lang.annotation.*;import java.lang.reflect.Field;import java.security.cert.CRLReason;public class Demo11 public static void main (String[] args) throws ClassNotFoundException, NoSuchFieldException Class c1 = Class.forName("Student2" ); Annotation[] annotations = c1.getAnnotations(); for (Annotation annotation : annotations) { System.out.println(annotation); } Table table = (Table)c1.getAnnotation(Table.class); String value = table.value(); System.out.println(value); Field f = c1.getDeclaredField("name" ); Filed annotation=f.getAnnotation(Filed.class); System.out.println(annotation.columnName()); System.out.println(annotation.length()); System.out.println(annotation.type()); } } @Table("db_student") class Student2 @Filed(columnName = "db_id",type = "int",length = 10) private int id; @Filed(columnName = "db_age",type = "int",length = 10) private int age; @Filed(columnName = "db_name",type = "varchar",length = 3) private String name; public Student2 () public Student2 (int id, int age, String name) this .id = id; this .age = age; this .name = name; } } @Target(ElementType.TYPE) @Retention(RetentionPolicy.RUNTIME) @interface Table{ String value () ; } @Target(ElementType.FIELD) @Retention(RetentionPolicy.RUNTIME) @interface Filed{ String columnName () ; String type () ; int length () }
代理 代理模式
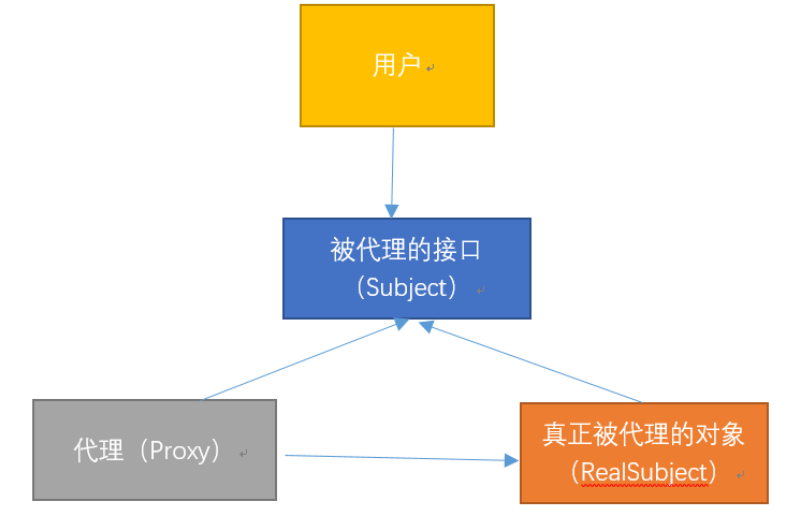
举例子:用户去火车站买票,接口就是售票。真正被代理的对象是售票点,代理就是黄牛,用户只关心售票这个功能实现(即能买到票),不关心是谁卖的。黄牛也要使用售票点的售票机(即被代理对象的方法)来得到票,此外还会提供多的服务,比如帮你把票装在信封里。
用户只关心接口功能,而不在乎谁提供了功能。上图中接口是 Subject。
接口真正实现者是上图的 RealSubject,但是它不与用户直接接触,而是通过代理。
代理就是上图中的 Proxy,由于它实现了 Subject 接口,所以它能够直接与用户接触。
用户调用 Proxy 的时候,Proxy 内部调用了 RealSubject。所以,Proxy 是中介者,它可以增强 RealSubject 操作。
静态代理 1 2 3 4 5 6 7 8 9 10 11 12 13 14 15 16 17 18 19 20 21 22 23 24 25 26 27 28 29 30 31 32 33 34 35 36 37 38 39 40 public interface IUserDao public void save () } public class UserDao implements IUserDao @Override public void save () System.out.println("保存数据" ); } } public class UserDaoProxy implements IUserDao private IUserDao target; public UserDaoProxy (IUserDao target) this .target = target; } @Override public void save () System.out.println("开启事务" ); target.save(); System.out.println("提交事务" ); } } import org.junit.Test;public class StaticUserProxy @Test public void testStaticProxy () IUserDao target = new UserDao(); UserDaoProxy proxy = new UserDaoProxy(target); proxy.save(); } }
优点
代理模式在客户端与目标对象之间起到一个中介作用和保护目标对象的作用
代理对象可以扩展目标对象的功能
代理模式能将客户端与目标对象分离,在一定程度上降低了系统的耦合度。
缺点
代理对象需要与目标对象实现一样的接口,所以会有很多代理类,类太多.同时,一旦接口增加方法,目标对象与代理对象都要维护。
动态代理 参考这篇 理解
特点: 动态代理对象不需要实现接口,但是要求目标对象必须实现接口
主要用到两个类:
例子
1 2 3 4 5 6 7 8 9 10 11 12 13 14 15 16 17 18 19 20 21 22 23 24 25 26 27 28 29 30 31 32 33 34 35 36 37 38 39 40 41 42 43 44 45 46 47 48 49 50 51 52 53 54 55 public interface IUserDao public void save () } public class UserDao implements IUserDao @Override public void save () System.out.println("保存数据" ); } } import java.lang.reflect.InvocationHandler;import java.lang.reflect.Method;import java.lang.reflect.Proxy;public class ProxyFactory private Object target; public ProxyFactory (Object target) this .target = target; } public Object getProxyInstance () return Proxy.newProxyInstance( target.getClass().getClassLoader(), target.getClass().getInterfaces(), new InvocationHandler() { @Override public Object invoke (Object proxy, Method method, Object[] args) throws Throwable System.out.println("开启事务" ); Object returnValue = method.invoke(target, args); System.out.println("提交事务" ); return null ; } } ); } } import org.junit.Test;public class TestProxy @Test public void testDynamicProxy () IUserDao target = new UserDao(); System.out.println(target.getClass()); IUserDao proxy = (IUserDao) new ProxyFactory(target).getProxyInstance(); System.out.println(proxy.getClass()); proxy.save(); } }
cglib动态代理 类的动态代理
总结
静态代理实现较简单,只要代理对象对目标对象进行包装,即可实现增强功能,但静态代理只能为一个目标对象服务,如果目标对象过多,则会产生很多代理类
JDK动态代理需要目标对象实现业务接口,代理类只需实现InvocationHandler接口,通过反射代理方法,比较消耗系统性能,但可以减少代理类的数量,使用更灵活。
cglib代理无需实现接口,通过生成类字节码实现代理,比反射稍快,不存在性能问题,但cglib会继承目标对象,需要重写方法,所以目标对象不能为final类。
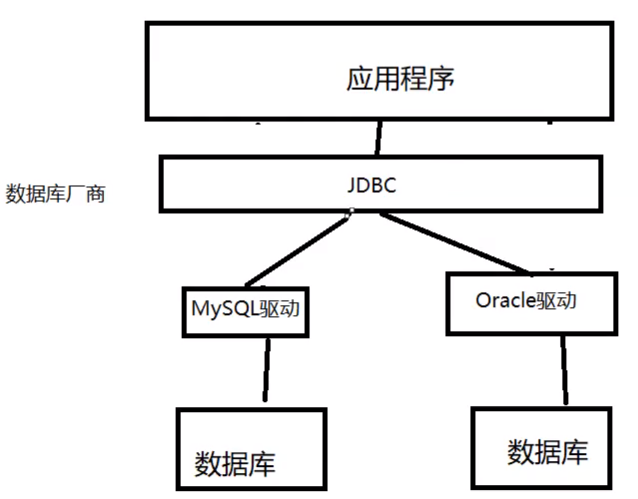
JDBC Java语言中操作数据库的规范接口,具体实现由各数据库厂商实现。
用到的包:java.sql javax.sql
添加依赖:搜索mysql-connector-java
建立测试数据库:
1 2 3 4 5 6 7 8 9 10 11 12 13 14 15 16 CREATE DATABASE jdbcStudy CHARACTER SET utf8 COLLATE utf8_general_ci;USE jdbcStudy; CREATE TABLE `users`(id INT PRIMARY KEY, NAME VARCHAR (40 ), PASSWORD VARCHAR (40 ), email VARCHAR (60 ), birthday DATE ); INSERT INTO `users`(id,NAME,PASSWORD,email,birthday)VALUES (1 ,'zhansan' ,'123456' ,'zs@sina.com' ,'1980-12-04' ),(2 ,'lisi' ,'123456' ,'lisi@sina.com' ,'1981-12-04' ), (3 ,'wangwu' ,'123456' ,'wangwu@sina.com' ,'1979-12-04' )
工具类:
属性配置
1 2 3 4 5 //db.properties存储信息降低耦合 driver=com.mysql.jdbc.Driver url=jdbc:mysql://localhost:3306/jdbcstudy?useSSL=false&useUnicode=true&characterEncoding=utf8 username=root password=123456
连接、配置和销毁
1 2 3 4 5 6 7 8 9 10 11 12 13 14 15 16 17 18 19 20 21 22 23 24 25 26 27 28 29 30 31 32 33 34 35 36 37 38 39 40 41 42 43 44 45 import java.io.InputStream;import java.sql.*;import java.util.Properties;public class JdbcUtils private static String driver=null ; private static String url=null ; private static String username=null ; private static String password=null ; static { try { InputStream in = JdbcUtils.class.getClassLoader().getResourceAsStream("db.properties" ); Properties properties=new Properties(); assert in != null ; properties.load(in); driver=properties.getProperty("driver" ); url=properties.getProperty("url" ); username=properties.getProperty("username" ); password=properties.getProperty("password" ); Class.forName(driver); }catch (Exception e){ e.printStackTrace(); } } public static Connection getConnection () throws SQLException return DriverManager.getConnection(url,username,password); } public static void release (Connection connection, Statement statement, ResultSet resultSet) throws Exception if (resultSet!=null ){ resultSet.close(); } if (statement!=null ){ statement.close(); } if (connection!=null ){ connection.close(); } } }
使用类
1 2 3 4 5 6 7 8 9 10 11 12 13 14 15 16 17 18 19 20 21 22 23 24 25 26 27 28 29 30 31 32 33 34 import utils.JdbcUtils;import java.util.Date;import java.sql.*;public class Test2 public static void main (String[] args) throws Exception Connection connection=null ; PreparedStatement statement=null ; ResultSet resultSet=null ; try { connection= JdbcUtils.getConnection(); String sql="insert into users(id,name,password,email,birthday)" + "values(?,?,?,?,?);" ; statement=connection.prepareStatement(sql); statement.setInt(1 ,99 ); statement.setString(2 ,"hhh" ); statement.setString(3 ,"12312313" ); statement.setString(4 ,"15612318@qq.com" ); statement.setDate(5 ,new java.sql.Date(new Date(1231 ).getTime())); int i=statement.executeUpdate(); if (i>0 ){ System.out.println("插入成功!" ); } }catch (Exception e){ e.printStackTrace(); }finally { JdbcUtils.release(connection,statement,resultSet); } } }
PreparedStatement可以避免SQL注入,通过占位符,把每个参数单独拎出来,从而避免注入问题。
增删查改
1 2 3 4 5 6 7 8 9 10 11 12 13 14 15 16 17 18 19 20 21 22 23 24 25 26 27 String sql="insert into users(id,name,password,email,birthday)" + "values(?,?,?,?,?);" ; statement=connection.prepareStatement(sql); statement.setInt(1 ,99 ); int i=statement.executeUpdate();String sql="delete from users where id=?;" ; statement=connection.prepareStatement(sql); statement.setInt(1 ,4 ); int i=statement.executeUpdate();String sql="update users set `NAME`=? where id=?;" ; statement=connection.prepareStatement(sql); statement.setString(1 ,"鲸秋" ); statement.setInt(2 ,1 ); int i=statement.executeUpdate();String sql="select * from users where id=?;" ; statement=connection.prepareStatement(sql); statement.setInt(1 ,1 ); ResultSet rs=statement.executeQuery(); if (rs.next()){ System.out.println(rs.getString("NAME" )); }
数据库连接池
参考这里
Junit
步骤:
定义一个测试类(测试用例)
建议:
测试类名:被测试的类名+Test 如:CalculatorTest
包名:xxx.xxx.xx.text 如:cn.itcast.test
定义测试方法:可以独立运行
建议:
方法名:test+测试的方法名 testAdd()
返回值:void
参数列表:空参
给方法加注解@test
导入junit依赖环境 (添加classpath 导入包,import org.junit.Test;)(这样方法就可以独立运行了)
判定结果:
红色:失败
绿色:成功
我们一般通过断言操作来处理结果,而不是直接输出结果
Assert.assertEquals(期望的结果,运算的结果);
补充注解:
@Before:修饰的方法会在测试方法之前被自动执行
@After:修饰的方法会在测试方法之后被执行


